Swift LINEぽいメッセージアプリの入力UIをつくったのでメモ
はじめに
かなり前にこちらでメッセージを表示する部分の吹き出しの作り方をメモした。
http://kimagureneet.hatenablog.com/entry/2015/09/19/005407
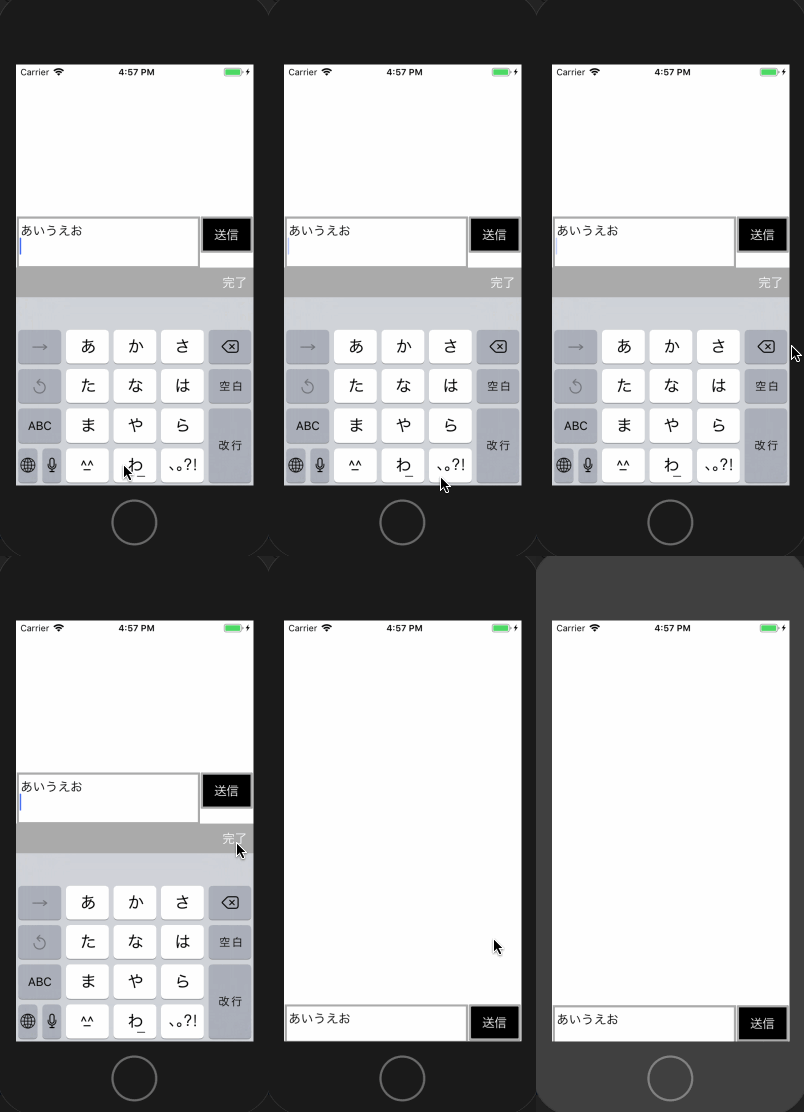
今回はメッセージ入力部分のUIの作り込みの方法をメモ。こんな感じのものを作りたかった。

やりたいことは
・入力フォームを画面下に固定
・フォーカスを当てたらキーボードの上に入力フォームを移動
・複数行にも対応したいのでUITextFieldでなくUITextViewを使用
上記を満たすためにやらなくてはならないこと(上と重複するけど)
・キーボードを開いたとき
入力フォームの位置をキーボードの上に移動
UITextViewの高さを複数行見えるように変更
・キーボードを閉じたとき
入力フォームの位置を画面下に移動
UITextViewの高さを1行見えるように変更
ざっくりこんな感じ。あとはキーボードの上に完了ボタンを追加したり細々とした内容。
実装
import UIKit

class ViewController: UIViewController, UITextViewDelegate {

    let MARGIN_MSG: CGFloat = 1
    let HEIGHT_BOX: CGFloat = 50
    let WIDTH_SUBMIT: CGFloat = 70

    let MIN_HEIGHT_MSG: CGFloat = 50
    let MAX_HEIGHT_MSG: CGFloat = 100

    // メッセージを表示する領域
    var tableView: UITableView!

    // メッセージBOX(入力フォームと送信ボタン)
    var box: UIView!
    var msg: UITextView!
    var submit: UIButton!

    // テーブルビューのサイズ情報
    var sizeTable: CGSize!

    // メッセージBOXのフレーム情報(キーボードが閉じられた時の情報)
    var frBox: CGRect!

    // キーボードのフレーム情報
    var frKeyboard: CGRect!

    override func viewDidLoad() {
        super.viewDidLoad()
	setView()
    }

    override func viewWillAppear(_ animated: Bool) {
        super.viewWillAppear(animated)
	let notificationCenter = NotificationCenter.default

        notificationCenter.addObserver(self, selector: #selector(ViewController.handleKeyboardWillShowNotification(_:)), name: .UIKeyboardWillShow, object: nil)
        notificationCenter.addObserver(self, selector: #selector(ViewController.handleKeyboardWillHideNotification(_:)), name: .UIKeyboardWillHide, object: nil)
    }

    override func viewWillDisappear(_ animated: Bool) {
        super.viewWillDisappear(animated)
        NotificationCenter.default.removeObserver(self, name: .UIKeyboardWillShow, object: self.view.window)
	NotificationCenter.default.removeObserver(self, name: .UIKeyboardDidHide, object: self.view.window)
    }

    // キーボードが表示されるときに行う処理
    @objc func handleKeyboardWillShowNotification(_ notification: Notification) {
        let userInfo = notification.userInfo!
        frKeyboard = (userInfo[UIKeyboardFrameEndUserInfoKey] as! NSValue).cgRectValue
        drawBox()
    }

    // キーボードが非表示になるときに行う処理
    @objc func handleKeyboardWillHideNotification(_ notification: Notification) {
        box.frame = frBox
        tableView.frame.size = sizeTable
    }

    // メッセージBOX描画処理
    func drawBox() {
        let statusBarHeight = UIApplication.shared.statusBarFrame.height
        let bound: CGSize = UIScreen.main.bounds.size
        var height = msg.sizeThatFits(CGSize(width: msg.frame.size.width, height: CGFloat.greatestFiniteMagnitude)).height
        if height < MIN_HEIGHT_MSG {
            height = MIN_HEIGHT_MSG
        } else if MAX_HEIGHT_MSG < height {
            height = MAX_HEIGHT_MSG
        }
        // 入力フォームの位置調整
        msg.frame = CGRect(x: msg.frame.origin.x, y: msg.frame.origin.y, width: msg.frame.width, height: height)
        box.frame = CGRect(x: box.frame.origin.x, y: bound.height - frKeyboard.size.height - box.frame.height, width: msg.frame.width, height: height)

        // テーブルビューの高さ調整
        tableView.frame.size = CGSize(width: tableView.frame.width, height: bound.height - (statusBarHeight + frKeyboard.height + height))
    }

    func textViewDidChange(_ textView: UITextView) {
	drawBox()
    }

    func setView() {

        let statusBarHeight = UIApplication.shared.statusBarFrame.height
        let widthMax = view.frame.width
        let heightMax = view.frame.height

        // メッセージを表示する領域
        tableView = UITableView(frame: CGRect(x:0, y:statusBarHeight, width:widthMax, height:heightMax - (statusBarHeight + HEIGHT_BOX)))
        tableView.separatorStyle = .none
        view.addSubview(tableView)

        // 入力フォームと送信ボタンを表示する領域
        box = UIView(frame: CGRect(x: 0, y: tableView.frame.origin.y + tableView.frame.height, width: widthMax, height: HEIGHT_BOX))
	view.addSubview(box)

        // 送信ボタン
        submit = UIButton(frame: CGRect(x: widthMax-(WIDTH_SUBMIT+MARGIN_MSG), y: MARGIN_MSG, width: WIDTH_SUBMIT, height: HEIGHT_BOX-MARGIN_MSG))
        submit.setTitle("送信", for: UIControlState.normal)
        submit.setTitleColor(UIColor.white, for: UIControlState.normal)
        submit.backgroundColor = UIColor.black
	submit.layer.cornerRadius = 2.0
        submit.layer.borderColor = UIColor.lightGray.cgColor
        submit.layer.borderWidth = 3
        box.addSubview(submit)

        // 入力フォーム
	msg = UITextView(frame: CGRect(x: MARGIN_MSG, y: MARGIN_MSG, width: widthMax-(MARGIN_MSG*3+WIDTH_SUBMIT), height: HEIGHT_BOX-MARGIN_MSG))
        msg.font = UIFont.systemFont(ofSize: 18)
        msg.layer.borderColor = UIColor.lightGray.cgColor
        msg.layer.borderWidth = 3
        msg.delegate = self
        box.addSubview(msg)

        // キーボード完了ボタン
        let keyboard = UIView(frame: CGRect(x: 0, y: 0, width: widthMax, height: 40))
        keyboard.backgroundColor = UIColor.lightGray
        let button = UIButton(frame: CGRect(x: widthMax - 50, y: 5, width: 50, height: 30))
        button.setTitle("完了", for: .normal)
        button.layer.cornerRadius = 2.0
        keyboard.addSubview(button)
	msg.inputAccessoryView = keyboard
        button.addTarget(self, action: #selector(onClose(sender:)), for: .touchUpInside)

        // メッセージBOXの位置を保持しておく
	frBox = box.frame

        // テーブルビューのサイズを保持しておく
        sizeTable = tableView.frame.size
    }

    // 完了ボタンでキーボードを閉じる
    @objc func onClose(sender: UIBarButtonItem){
        msg.endEditing(true)
    }

}
ずらずら書いたけど以上です。ちなみにSwift4で確認した。